Battery switch on travel trailer function is crucial for managing your RV’s power. Understanding how to use your battery switch correctly is key to preventing dead batteries and maximizing your off-grid adventures. This guide covers everything from basic operation and troubleshooting to advanced techniques for improving battery life and integrating your switch with other power systems like solar panels.
Let’s dive in!
We’ll explore different battery switch types, their wiring diagrams, and common problems. You’ll learn how to diagnose issues, perform routine maintenance, and even extend the lifespan of your batteries. By the end, you’ll be confident in managing your travel trailer’s power effectively.
Understanding Battery Switch Functionality in Travel Trailers

Your travel trailer’s battery switch is a crucial component, managing the power flow from your batteries to the trailer’s electrical system. Understanding its function is key to preventing electrical issues and ensuring a smooth camping experience. This section will explain the different types, wiring, safe usage, and necessary precautions.
Battery Switch Types in Travel Trailers
Travel trailers typically utilize either a simple single-battery switch or a more complex dual-battery switch. A single-battery switch simply connects or disconnects one battery to the trailer’s electrical system. A dual-battery switch, often a 1-2-both type, allows you to select either battery 1, battery 2, or both batteries simultaneously to power the trailer. This is advantageous for running appliances and charging devices over longer periods.
So, you’re planning a trip? Awesome! Don’t forget travel insurance! Check out Aon travel insurance for comprehensive coverage. They’ve got options for everything from lost luggage to medical emergencies. And if you’re into adventurous activities, Aon travel insurance might have a specific plan tailored for your thrill-seeking escapades. Seriously, protecting your trip is key; get a quote today!
Some higher-end systems incorporate more sophisticated switches with remote control or digital displays.
Wiring Diagrams for a 1-2-Both Battery Switch Setup
A typical 1-2-both battery switch uses a rotary switch with three positions: 1, 2, and Both. The wiring diagram involves connecting the positive (+) cables from each battery to separate terminals on the switch. Another positive cable then runs from the switch’s output terminal to the trailer’s positive bus bar. Negative (-) cables from each battery are typically connected directly to the trailer’s negative bus bar, bypassing the switch for safety reasons.
A simple diagram would show Battery 1 (+) connected to switch terminal 1, Battery 2 (+) connected to switch terminal 2, and the trailer’s (+) bus bar connected to the “Both” terminal. The negative cables from both batteries would connect directly to the trailer’s (-) bus bar. This setup allows for isolation of individual batteries for maintenance or charging.
Proper Use of a Battery Switch, Battery switch on travel trailer function
Using your battery switch correctly is vital for preventing electrical problems. Before connecting to shore power, always ensure the switch is in the “Off” position (if available, some switches only have 1, 2, and Both). This prevents backfeeding and potential damage to the charging system. When using the trailer without shore power, select the appropriate battery position (1, 2, or Both) depending on your needs and battery charge levels.
Remember to turn the switch to “Off” when leaving the trailer unattended for extended periods to conserve battery power and prevent accidental discharges.
Safety Precautions When Working with Battery Switches
Working with batteries and electrical systems requires caution. Always disconnect the negative (-) cable from the battery before working on any electrical components. Wear safety glasses to protect your eyes from sparks or acid splashes. Never touch the battery terminals while the switch is on, as this can lead to a shock. If you are unsure about any aspect of your battery switch or electrical system, consult a qualified RV technician.
Ensure proper ventilation when working with batteries to avoid exposure to potentially harmful gases. Always use insulated tools to prevent accidental shorts.
Troubleshooting Common Battery Switch Issues
Dealing with a malfunctioning battery switch in your travel trailer can be frustrating, but with a systematic approach, you can usually pinpoint the problem and get back on the road. Common issues stem from simple problems easily solved with basic tools and a little know-how. Let’s explore how to identify and fix these problems.Troubleshooting a battery switch often involves checking for the most common culprits: corrosion and loose connections.
These are often the easiest fixes and can save you time and money compared to replacing the entire switch. A visual inspection is always the first step.
Corrosion Identification and Cleaning
Corrosion is a frequent enemy of electrical connections, especially in the damp environment often found around batteries. It creates a film that inhibits the flow of electricity. Look closely at the terminals of both your batteries and the battery switch itself. You’ll often see a whitish, greenish, or bluish buildup. If you find corrosion, carefully clean the terminals with a wire brush, a battery terminal cleaner, or even baking soda and water.
So, you’re planning a trip? Awesome! Don’t forget travel insurance – it’s a lifesaver. Check out Aon travel insurance for comprehensive coverage. They’ve got options for everything from lost luggage to medical emergencies. If you’re into adventure travel, Aon travel insurance might have specific plans designed for your activities, so definitely look into that before you go.
Peace of mind is priceless, right?
Make sure to disconnect the battery cables before cleaning to avoid short circuits. After cleaning, apply a dielectric grease to protect the cleaned terminals from future corrosion. This simple preventative measure can extend the life of your battery switch and connections significantly.
Loose Connections and Tightening
Loose connections are another common cause of battery switch malfunctions. Over time, vibrations from travel can loosen the bolts connecting the cables to the battery terminals and the switch itself. Inspect each connection for tightness. If you find a loose connection, tighten the bolt securely. Don’t overtighten, as this can damage the terminals.
Remember, a good, snug connection is crucial for reliable power flow.
Diagnosing a Dead Battery versus a Faulty Switch
Determining whether the problem lies with the battery or the switch requires a simple test. First, ensure the switch is correctly set to the desired position (either battery, both, or off). Use a voltmeter to check the voltage at the battery terminals. A fully charged 12-volt battery should read around 12.6 volts. If the voltage is low, the battery is likely dead or needs charging.
If the voltage is good at the battery but you have no power at the appliances, the problem likely lies with the switch or the wiring between the switch and the appliances. Always check fuses and circuit breakers before concluding that the switch is faulty.
Battery Switch System Maintenance Checklist
Regular maintenance can prevent many battery switch problems. Here’s a simple checklist for routine inspections:
- Inspect battery terminals and switch connections for corrosion at least twice a year, or more often in humid climates.
- Tighten all connections as needed. Use a torque wrench to avoid over-tightening.
- Clean terminals with a wire brush and apply dielectric grease.
- Check all fuses and circuit breakers related to the battery system.
- Test the battery voltage regularly to ensure it’s adequately charged.
Following this checklist can significantly extend the life of your battery switch and prevent unexpected power outages on your travels.
Battery Switch Types and Their Applications
Choosing the right battery switch for your travel trailer is crucial for managing your power systems efficiently and safely. Different switch types offer varying levels of complexity, convenience, and cost. Understanding their features helps you select the best option for your needs.
Three primary types of battery switches are commonly found in RVs: rotary switches, rocker switches, and push-button switches. Each has its own strengths and weaknesses concerning ease of use, durability, and cost.
Rotary Battery Switches
Rotary switches are a classic choice, known for their simple, reliable operation. They typically feature a rotating dial with multiple positions, allowing you to select between different battery banks (house battery, starting battery, both combined, or off). Their robust construction generally makes them durable and long-lasting. However, they can be somewhat less intuitive than other switch types, especially for those unfamiliar with their operation.
The physical rotation can also be cumbersome in tight spaces.
Rocker Battery Switches
Rocker switches provide a more modern and often more user-friendly alternative to rotary switches. Their simple on/off toggling mechanism is straightforward and easily understood. Many rocker switches incorporate LED indicators, clearly showing the switch’s status. While generally reliable, they might not offer the same level of ruggedness as some rotary switches, and finding a rocker switch with multiple battery bank selection capabilities can be more challenging.
Push-Button Battery Switches
Push-button switches represent a more advanced option, often integrating electronic controls and features like digital displays or remote control capabilities. These switches can provide more sophisticated power management options, such as monitoring battery voltage and charge levels. However, their electronic components can be more prone to failure than the purely mechanical designs of rotary and rocker switches, and they typically come with a higher price tag.
Comparison of Battery Switch Types
The table below summarizes the key features, price points, and ease of installation for the three main types of battery switches.
| Feature | Rotary Switch | Rocker Switch | Push-Button Switch |
|---|---|---|---|
| Ease of Use | Moderate | Easy | Easy to Moderate (depending on features) |
| Durability | High | Moderate | Moderate to Low (depending on quality) |
| Cost | Low to Moderate | Low to Moderate | Moderate to High |
| Installation Difficulty | Moderate | Easy | Moderate to Difficult (depending on features) |
| Typical Number of Banks Switched | 2-4 | 1-2 | 1-4 (often with more complex control) |
Battery Switch and Power Management Systems
Your travel trailer’s battery switch is a central player in its power management system, acting as the conductor of electrical flow between your batteries and the various appliances and charging sources. Understanding its interaction with other components is crucial for efficient and reliable power usage.The battery switch works in conjunction with other power system elements to ensure a smooth and controlled distribution of power.
For instance, when the switch is set to “Battery,” power flows directly from your house batteries to your trailer’s appliances. When switched to “Off,” this flow is interrupted, preventing accidental discharge. In the “Both” or “Combined” position (depending on the switch type), power from both the shore power (mains electricity) and your house batteries is available, typically allowing charging of the house batteries from the shore power while simultaneously powering your appliances.
This interaction is vital for preventing overcharging and maximizing battery life.
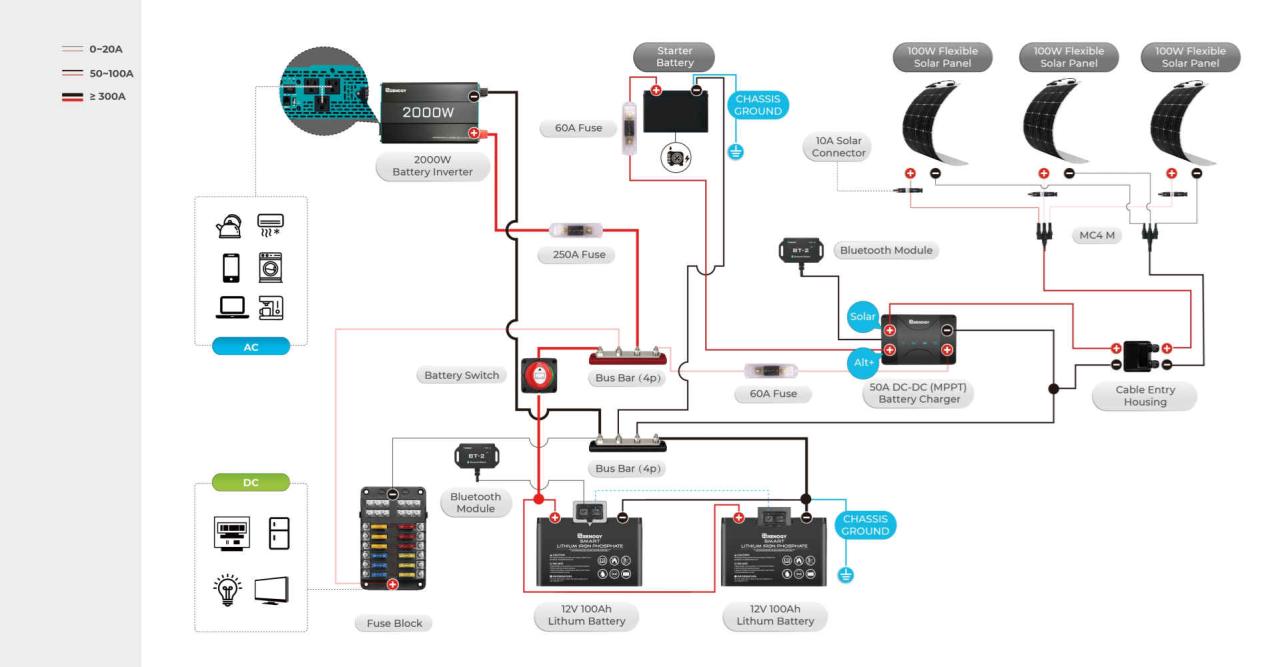
Solar Panel Integration with Battery Switch
Connecting a solar panel charging system to your battery switch involves a few key steps. First, the solar panel’s positive and negative wires should be connected to a solar charge controller. This controller regulates the voltage and current from the solar panels, preventing overcharging of your batteries. The output of the charge controller then connects to your battery switch.
The positive wire from the controller connects to the positive terminal of your house battery via the switch, and similarly, the negative wire connects to the negative terminal. This configuration allows the solar panels to charge your batteries only when the switch is in the “Battery” or “Both” position. It’s crucial to ensure correct polarity during this connection to avoid damaging your equipment.
A mis-wired system could cause short circuits and irreparable damage.
Impact of a Faulty Battery Switch on Power Management System Efficiency
A malfunctioning battery switch can significantly reduce the efficiency of your travel trailer’s power management system. A switch that is stuck in the “Off” position will prevent any power from reaching your appliances, rendering them unusable. Conversely, a switch that is stuck in the “On” position, or one with internal short circuits, could lead to continuous battery discharge, even when not in use, potentially draining your batteries completely.
This can result in the need for frequent recharging, decreased battery lifespan, and even the potential for damage to your batteries or other electrical components. Additionally, a faulty switch can interfere with the proper charging of your batteries from either shore power or solar panels, leading to inconsistent power supply and reduced overall system performance. For example, if the switch fails to connect the batteries to the charger, they will not receive a charge, leaving you with a dead battery when you need it most.
Regular inspection and maintenance of your battery switch are therefore essential for optimal power management.
Visual Guide to Battery Switch Components and Wiring: Battery Switch On Travel Trailer Function
Understanding the physical components and wiring of your battery switch is crucial for safe and effective operation of your travel trailer’s electrical system. This section provides a detailed look at the typical components and a descriptive illustration of a standard installation.This visual guide helps you understand the physical aspects of a typical battery switch and its wiring. We’ll cover the main components and then illustrate a common installation scenario.
Battery Switch Components
A typical battery switch consists of several key components. There are typically several large terminals, usually marked with clear labels indicating which battery they connect to (e.g., “Battery 1,” “Battery 2,” “House,” “Chassis”). These terminals are robustly built to handle the high current flow from your batteries. The switch itself will have a handle, often a rotary type, allowing you to select different configurations.
This handle is the user interface for controlling the power flow. The internal mechanism is a complex arrangement of heavy-duty contacts that make and break the connection between the terminals based on the handle’s position. The contacts are designed to handle significant current without overheating or damage. Proper maintenance of these components ensures long-lasting performance.
Descriptive Illustration of Battery Switch Installation
Imagine a typical battery switch installation under the tongue of your travel trailer. Two heavy-gauge wires run from each of your two batteries (let’s call them Battery 1 and Battery 2). These wires are securely bolted to the corresponding terminals on the battery switch. From the switch, another set of heavy-gauge wires run to the main power distribution panel of the trailer.
These wires provide power to the house circuits (lights, appliances, etc.). A smaller gauge wire, often red, may connect to the chassis or a dedicated ground point. The battery switch is typically mounted securely to a sturdy surface, using appropriate hardware to prevent vibration. All connections are made using appropriately sized bolts and nuts, ensuring a secure and reliable electrical connection.
The wires should be carefully routed and secured with clips to prevent chafing or short circuits. A properly labeled diagram near the switch is highly recommended for quick identification of wires. Remember, neat wiring makes troubleshooting much easier.
Tools and Materials for Battery Switch Installation or Repair
Proper tools and materials are essential for a safe and effective installation or repair. Using the wrong tools or materials can lead to damaged components or even safety hazards.
- Heavy-duty wire strippers/cutters
- Crimping tool with appropriate dies for your wire gauge
- Wrench set (metric and/or SAE, depending on your battery terminals and switch)
- Screwdrivers (Phillips and flathead)
- Battery terminal cleaner and protector
- Heavy-gauge battery cables (appropriate size for your system’s amperage)
- Ring terminals (crimped onto the ends of your battery cables)
- Cable ties or clamps for securing wiring
- Electrical tape (for added insulation)
- Safety glasses and gloves
Mastering your travel trailer’s battery switch is a game-changer for extending your off-grid capabilities and preventing frustrating power outages. From understanding the basics of operation to tackling troubleshooting and maximizing battery life, this guide provides the knowledge you need to confidently manage your RV’s power. Remember to always prioritize safety when working with batteries and electrical systems. Happy travels!
Popular Questions
What happens if I leave my battery switch in the “off” position?
Leaving the switch off completely disconnects both your house and chassis batteries, preventing any power drain, even from small devices. This is ideal for long-term storage.
Can I use a battery switch with a lithium battery?
While some battery switches work with lithium, it’s crucial to check the switch’s specifications and ensure compatibility. Lithium batteries have specific charging and safety requirements.
How often should I clean my battery switch terminals?
Inspect and clean your battery switch terminals at least once a year, or more often if you notice corrosion or performance issues. Use a wire brush and baking soda solution.
My battery switch is making clicking noises. What’s wrong?
Clicking noises usually indicate a weak battery, loose connections, or a faulty switch itself. Check connections and test your battery voltage before replacing the switch.
